What makes that break-barrel air rifle tick, anyway? Performing your own basic airgun service can bring reward in the form of improved shooting behavior and increased familiarity with your gun. Spring breakage or fatigue, piston seal damage, inspection and lubrication or the desire for increased power and accuracy are good reasons to DIY. With a bit of knowledge and planning, plus a few common tools and a simple spring compressor, you’ll confidently plunge into the heart of the beast.
Start with a neat workspace and take clear photos at each step during take-down. Having specialized gunsmithing tools is a plus, but you’ll be fine using quality hand tools in good condition. Be sure your Phillips head drivers are a proper fit for each screw head. Follow this link to build a spring compressor quickly and cheaply:
Aside from any project-specific parts or tools, you’ll need (PHOTO 2):
- Spring Compressor
- Screwdrivers of correct style and size
- Set of small pin punches
- Small ball-peen or tap hammer
- Moly (Molybdenum) grease
- Several shop rags

Lift the action from the stock (PHOTO 5).
Remove the barrel pivot screw and bushing (PHOTO 6) to separate barrel from action, taking care to keep track of the pivot thrust washers (these are the large washers on each side of the breech block) (PHOTO 7).
While barrel removal isn’t necessary prior to mainspring and piston removal, doing so adds just minutes to the job and offers a good opportunity to clean old lube from the pivot areas of the barrel and action, including the pivot screw, bushing, thrust washers, and barrel lock mechanism. Fresh moly lube applied during reassembly will prevent premature wear to these parts.
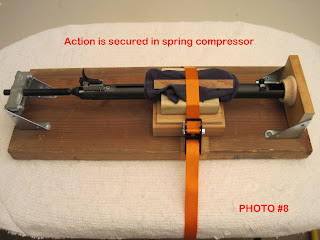
Next, secure the action in the spring compressor (PHOTO 8), centering the compressor shoe with the rear of the trigger assembly.
Identify the retaining pins – these are what hold things together by containing spring tension (PHOTO 9).
Turn the compressor screw in until it makes firm contact with the rear of the trigger assembly, but no further. Using the appropriate size of pin punch, attempt to push the retaining pins out with hand pressure. If they don’t push out easily, increase compression very slightly and try again by hand, or tap the pin punch lightly with your hammer to remove them (PHOTO 10).
Once the pins are out, mainspring tension will be contained by the compressor. Slowly release tension by turning the compressor screw out until the spring is relaxed. This RWS had about 2 inches of spring tension. (PHOTO 11).
Separate the trigger assembly and carefully set it aside. Remove the mainspring and guide, then piston and seal, while keeping track of any ancillary parts (PHOTO 12).
You’re done with basic disassembly. Once you’ve completed your planned modification or repair, reassembly will be straightforward, in reverse of what we’ve covered. Be sure to lubricate your air rifle properly, keeping any petroleum-based products out of the compression chamber. I hope this guide helps remove some of the mystery you may feel about your air rifle’s inner workings, and gets you thinking of it more like an old friend.
Safe shooting!
Ken
Safe shooting!
Ken


