Sunday, November 27, 2011

Break-Barrel Air Rifle Disassembly

What makes that break-barrel air rifle tick, anyway?  Performing your own basic airgun service can bring reward in the form of improved shooting behavior and increased familiarity with your gun.  Spring breakage or fatigue, piston seal damage, inspection and lubrication or the desire for increased power and accuracy are good reasons to DIY.  With a bit of knowledge and planning, plus a few common tools and a simple spring compressor, you’ll confidently plunge into the heart of the beast.

The RWS 350 Pro Compact used here for demonstration is a good example of typical break-barrel design, so the steps outlined should carry over well to other makes and models.  I’ll be swapping out the stock mainspring and guide for an aftermarket kit designed to give a smoother firing cycle, and replacing the stock piston seal while I’m in there.  The focus of this article however, will be on disassembly and reassembly.  Let’s get going… 


Start with a neat workspace and take clear photos at each step during take-down.  Having specialized gunsmithing tools is a plus, but you’ll be fine using quality hand tools in good condition.  Be sure your Phillips head drivers are a proper fit for each screw head.  Follow this link to build a spring compressor quickly and cheaply:

Aside from any project-specific parts or tools, you’ll need (PHOTO 2):

  • Spring Compressor
  • Screwdrivers of correct style and size
  • Set of small pin punches
  • Small ball-peen or tap hammer
  • Moly (Molybdenum) grease
  • Several shop rags
If your gun is scoped, remove the scope.  Remove the (3) screws securing the action in the stock (PHOTOS 3, 4).


Lift the action from the stock (PHOTO 5).


Remove the barrel pivot screw and bushing (PHOTO 6) to separate barrel from action, taking care to keep track of the pivot thrust washers (these are the large washers on each side of the breech block) (PHOTO 7).


While barrel removal isn’t necessary prior to mainspring and piston removal, doing so adds just minutes to the job and offers a good opportunity to clean old lube from the pivot areas of the barrel and action, including the pivot screw, bushing, thrust washers, and barrel lock mechanism.  Fresh moly lube applied during reassembly will prevent premature wear to these parts.

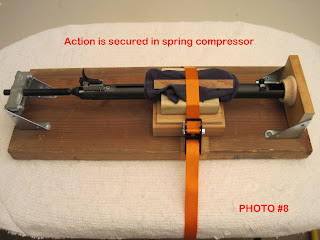
Next, secure the action in the spring compressor (PHOTO 8), centering the compressor shoe with the rear of the trigger assembly.


Identify the retaining pins – these are what hold things together by containing spring tension (PHOTO 9). 


Turn the compressor screw in until it makes firm contact with the rear of the trigger assembly, but no further.  Using the appropriate size of pin punch, attempt to push the retaining pins out with hand pressure.  If they don’t push out easily, increase compression very slightly and try again by hand, or tap the pin punch lightly with your hammer to remove them (PHOTO 10). 


Once the pins are out, mainspring tension will be contained by the compressor.  Slowly release tension by turning the compressor screw out until the spring is relaxed. This RWS had about 2 inches of spring tension. (PHOTO 11).


Separate the trigger assembly and carefully set it aside.  Remove the mainspring and guide, then piston and seal, while keeping track of any ancillary parts (PHOTO 12).


You’re done with basic disassembly.  Once you’ve completed your planned modification or repair, reassembly will be straightforward, in reverse of what we’ve covered.  Be sure to lubricate your air rifle properly, keeping any petroleum-based products out of the compression chamber.  I hope this guide helps remove some of the mystery you may feel about your air rifle’s inner workings, and gets you thinking of it more like an old friend. 

Safe shooting! 
Ken


Saturday, October 8, 2011

A Silent and Practical Pellet Trap

Learning to properly compensate for elevation when shooting up into a tree or down into a ravine is important to the shooter, but our weapons should be sighted in with a target that's level to us.  While my home and property location afford me a safe place to shoot airguns, the terrain slopes down and away in the area which is otherwise the best direction to shoot, to the tune of 11.5 feet at 35 yards.  Hmm.


My solution was to construct an elevated target tower.  Initially I was contemplating something with pulleys and counterweight, but went with something simple and effective, and pretty much designed it as I went along.  It requires a bit of muscle to lower and raise for target changes, but it's easily manageable.  Below we look out to this target tower from my back sun porch, where my shooting table is set up.  It's there in the middle of the photo...can you see it?  I'm surprised I can hit those little red dots from here, lol.  I'll take you a little closer.


I built this contraption last year (2010) with practicality and durability in mind, and I think I've succeeded there.  It held up through our nasty winter and then Hurricane Irene, without moving at all.  The wood is all PT except for the expendable face, which sits in grooves at the edges and easily slides out when the top of the target box is removed.  I have about 7,500 to 8,000 pellets into it so far.


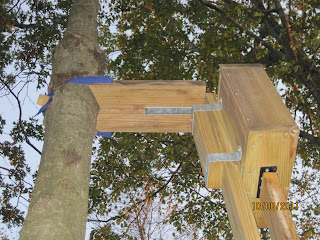
Got to Love Home Depot!  Above you see the simple slide mechanism, and the no-harm-done means of anchoring to the tree (this tree has seen better days though).  Notice the block of wood tapped in under the anchoring strap, to keep it tight.  The heavy duty L-bracket is recessed into the vertical main beam, so the target box can be easily raised all the way up without bumping into it.  It's good to own a router.


The angle cut (above) keeps things stable and safe, locked together until the moveable support beam is lifted out for lowering of the target box.  Below is the pivoting "foot", firmly anchored with PT stakes and galvanized hardware.  Pivoting allows the foot to conform to the incline of the land.  The main beam is pointed and extends several inches below the foot and into the ground, further anchoring and stabilizing the whole assembly.  The block with the angle cut (below) is where the moveable support beam (the piece with the handles on it) will rest when the target is in the halfway down position.


Time to bring 'er down to change the target out.  As I mentioned, some effort is needed to lower and raise a box made out of thick pressure treated wood and filled with dense electrician's duct seal as a means of stopping pellets - which it does very well, I should add.  First, I grab the lower handle and bring the moveable support beam down to rest on the lower support block, putting the target box in its halfway-down position - looks like this:


Then I'll grab the upper handle and lower the target box (below) to its bottom position, where it's sitting atop the lower main beam.  The moveable support beam just rests on the ground in front of the tower at this point.  This puts the target box at perfect working height, allowing me to change out targets easily - looks like this:


There's about 30 pounds of electrician's duct seal in the box (below), a bit of overkill but I don't care.  It's cheap and effective - here's a link to the stuff:

 
Consistency doesn't seem to change with New England's temperature fluctuations, and you can shoot many, many pellets into this stuff before needing to clean it up and top it off.  The amount in my target box would probably stop subsonic .22 rimfire.  Pellets and bits of duct seal which collect at the bottom are easily collected and disposed of properly.


Let's get our new target in there and get 'er raised back up for some shooting!  Procedure is the reverse of the lowering sequence.  I can do a target change in about 30 seconds, but what's the hurry?  Shooting is my relaxation time. Make sure you get yours in soon! 


Friends who come over to shoot think it's pretty neat.  Should I paint it camo, just for the heck of it?  In addition to being on a level shooting plane, safety is enhanced due to the lay of the land beyond the target (treetops, much further than my pellet will ever travel).  It's a nearly silent trap, requiring just about zero maintenance.  Have fun putting yours together!

Safe Shooting,
Ken  


Friday, October 7, 2011

Crosman Custom Shop 2300 (2240)

The soup cans in my house have been running for cover lately, and for good reason.  During the process of figuring out which pellet would shoot best in my RWS 350 Magnum, I accumulated a boat load (okay well, many tins) of .22 pellets of various styles and weights which wouldn't find their way to the bullseye on a consistent enough basis, when fired from that gun.  What to do with all those nearly full tins of pellets?  Well, I thought the Crosman 2240 might be just the tool for the job...yeah, some fun and relaxing plinking to go along with hunting down those little red dots.  And I was right - sort of.  Upon spending my $60 and receiving the 2240, I liked the way it shot well enough, but was not crazy about the feel of the gun due to the abundance of plastic parts, including the breech, sights, and hollow-sounding grips.  Hey, I understand they're trying to hit the price point, but I wanted more.  So I decided to do what any responsible, value-minded airgunner would do in this situation.  UPGRADE!


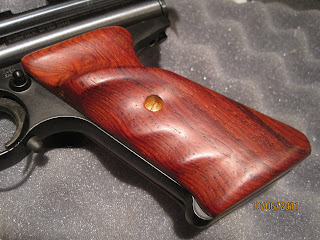
Whoa Baby, now THAT'S more like it!   This is the Model 2300, a product of Crosman's Custom Shop (http://www.crosman.com/custom-shop/), a division within Crosman which allows enthusiasts to create custom pistol and carbine interpretations of the super-popular 2240 platform.  You choose your barrel length, long or short steel breech, type of sights, muzzle, and grips (These parts and others can be purchased separately from the Custom Shop to upgrade your 2240).  Items from the custom shop demonstrate a noticeably higher level of finish than standard production versions, along with toned-down warning labeling on the airtube.  You can even have yours custom engraved with your nickname or initials, how about that! Custom Shop triggers, though not perfect, are easily adjustable for pull weight, and include a trigger stop pin in the trigger guard.

I like the way you can click away on the Custom Shop site, to change the appearance and cost of your dream piece in real time.  Neat!  After several visits and lots of clicking, I was ready to go all the way.  So, with the help of my good friend Vin (whose job was to sit there and say "Yeah, get it, get it!") I ordered mine up as follows:  10.1" barrel, long steel breech, black muzzle, Williams notch rear sight with front post, and Cocobolo grips.  In about 4 weeks, Mr. Brown Santa came rolling up with the goodies, and I was about $220 lighter.


How's it work?  I think you're gonna' like it!  In warm weather (the friend of CO2-powered guns) the 2300 sends 14.3 grain Crosman Premiers across the chronograph at just over 500 feet per second (compared to around 440 fps for the standard 2240 with its 7.5" barrel).  This gives a pretty decent 8 ft/lbs of muzzle energy (fpe).  Figure on getting about 35 to 40 full-powered shots per 12-gram CO2 Powerlet with the 2300 or 2240.  There are aftermarket modifications available which increase the muzzle velocity to near 600 fps while reducing the number of full-power shots to about 20.  While this is no hunting airgun, it would be far better for close-range pest control than a .177 caliber gun firing its lighter pellet at the same velocity.  A 7.9 grain .177 cal pellet moving at the same 510 fps carries only about half the energy, at 4.5 fpe.   Do you want to be undergunned when that opossum comes charging out of the garbage can?  Of course, for punching holes in paper none of this fpe stuff matters, and from 30 feet away I'll typically group about 3/4" to 1" using the open notch Williams sight and front round post, when shooting from a rest.   I'm beginning to check out some red-dot sights, but I really enjoy the challenge and tradition of using open sights for handgun target shooting.  I notice that the Custom Shop gun with its longer barrel is quieter than the standard 2240, wich could be a plus in some circumstances.

Every gun is best for something, and this one's best for shooting...stuff!  Ping Pong balls, little army men, soup and Tuna cans, paintballs, whatever.  Plastic drink bottles on tomato stakes give a nice "THWACK!" upon impact, but beer cans look cooler.  The creepy single-stage trigger begs for a custom setup (A custom custom?) and the casting line on the barrel band reminds us of the gun's humble origins, but overall it's a beautiful, hand-filling and satisfying hunk of metal and wood.  There is a huge cult following of this 2240 platform, and the aftermarket offers modifications ranging from the basic to beyond imagination.  It's the Ruger 10/22 of the airgun world, you might say.


I enjoy the heavier weight and solid heft of this gun.  It's this more substantial feel which seems to add so much to the perception vs. the standard 2240.  Longer barrel, steel breech and wood grips will do that for you, yep.  Speaking of grips, I believe they are supplied to Crosman by RB Grips (Ralph Brown).  Aside from the Cocobolo, you can also choose Zebrawood, Maple or Walnut, all very nice.  The set I received still showed more swirly sanding marks than I like to see, and I didn't care for the glossy finish anyway, so I chemically stripped them, then smoothed them using steel wool, then oiled them.  They now have the perfectly smooth, satin finish I prefer.  Overall the Custom Shop treatment results in a very cool, custom and unique air pistol that doesn't break the bank, while pride of ownership adds to the value.


Thanks for stopping by!  Please keep this airgun blog in your sights, and I welcome your comments. 

Safe Shooting,
Ken


Sunday, October 2, 2011

It's National Teach Your Kids to Shoot Day!

Okay such a day may not really exist, but as a Dad and proud NRA member, you have my vote for it anyway.  While we're not quite spread out enough to use firearms at our home property, we do have the ability to safely shoot our airguns out to about 40 yards.  Here though, Sarah's got her sights (quite literally) set on a target much closer.  This was last year when she was 10, but she seemed to have pretty good command of that Red Ryder.  8-year-old Gianna watches in the backround, probably thinking "All I want to do is hit the paper".

Not bad for about 30 feet away, using a Red Ryder.  Nice job Sarah.

Fast forward one year...bigger, stronger, and getting a kick out of the RWS 350.  Serious business!

You can do it kid...remember your sight picture...now sqeeeeeze the trigger.

Not a bad job at all for an 8-year-old!  You're on paper!  

Passing shooting or archery skills along to your kids provides for hours of great fun and friendly competition, while strengthening bonds of trust.  I enjoy seeing my daughters shift into their serious, "responsible mode" when the guns come out, while the excitement on their faces when they hit the target is priceless.  I'm sure the required focus and discipline will help build character, and family time is the best time of all (except on Poker Night).  So if you think it might be time, grab a couple extra pairs of shooting glasses, set up a safe backstop, and (after going over the basics of safe gun handling) teach 'em to shoot!

Safe Shooting,
Ken

Saturday, October 1, 2011

Connecticut Fried Squirrel

These last couple years in Connecticut, we've seen a bumper crop of acorns and the furry gray critters that like to eat those acorns.  I can't remember ever seeing so many squirrels running around here, there and everywhere (and lying flat on the road)!  There's always a good story to be told about the damage they're capable of when they get into gardens, attics, walls and antique cars.  Personally, I like to get to them before they get to me, and invite them in for dinner.  As you can see, these 2 rascals happily accepted.


The larger one was taken first, from the top of a very tall oak, about 35 yards away plus elevation; I held dead on, using shooting sticks from a sitting position.  Smaller one was facing me at 20 yards and about 10 feet up, so I held slightly low while bracing against a small tree for stability.  (I don't allow the gun to come into direct contact with any rest - my hand rests on or braces against the object providing stability, while also supporting the forestock)  Both were quick, clean head shots using H&N FTT's in 14.66 grain, which leave the muzzle at 830 fps.  I will not shoot at any game or pest unless my weapon is properly sighted in. 


Squirrels can be field dressed in just a few minutes each, without a lot of fuss.  Here, they're all cleaned up and ready to be quartered, after which they'll go into a bowl of buttermilk for the night (in the fridge, along with some herbs and spices).  The recipe I'm using is for Buttermilk Fried Squirrel, which I found online here:

http://www.americanhunter.org/articles/recipe-fried-squirrel/.   


Mom, that old electric frying pan you gave me when I was a bachelor sure comes in handy...great for making fried dough, and squirrel too!


Extra crispy outside, tender and delicious inside...some say it's the tastiest meat to come out of the woods.  Put some Bushytail on the table and tell me what you think!


My 9-year-old daughter Gianna loves it.  Not too many Connecticut kids being raised on squirrel, I'm willing to bet.  Cheers!

Safe Shooting
Ken


Friday, September 30, 2011

Find Your Magic Pellet

I'll be to the point, with an important message gleaned from personal experience.  That is - if you truly care about being as accurate as possible with any given air rifle or pistol, try as many pellet brands, styles and weights as neccesary!  There will be one or two pellets that prove to be most accurate in each gun, and among these, you'll likely see different points of impact (POI) on the range.  Pick your favorite, stick with it and practice at different yardages.  Once we have our gun broken in or tuned so it's smoothed out and consistent, our technique refined and repeatable with just about every shot, and our most accurate pellet identified, we can begin to really get to know the gun better and shoot it accurately every time we pick it up.


From the time I first got my RWS 350 Pro Compact, I tried 10 or 12 different pellets including several JSB's, RWS, Crosman, Beeman, Gamo and others, before deciding that Crosman Premier domes were the best for my gun.  So many have claimed to get the best out of their guns using CP's, I guessed that would be true for me too.  For the next 8 or 9 months I shot only CP's, and resigned myself to the fact that the best this gun would shoot was 1.25" center-to-center 5-shot groups at 35 yards, at least with any consistency.  And that doesn't include the frequent fliers!  I just wasn't having enough fun with that degree of accuracy, and started to think about selling the gun.  Then, on a whim I decided to try a few pellets I had not yet.


It's revelation time!  The order I placed included Air Arms Diabolos in 18.1g (5.52 head size), and the H&N FTT in 14.66g with the 5.55 head size, among others.  10-shot 3/4" outside-to-outside groups are now the norm at the same 35 yards, and at 25 yards it's one ragged hole with either pellet.    The edge goes to the H&N's, but both give me the kind of accuracy I find very satisfying from a magnum springer.  What good is all that power (23 ft/lbs in this case) without accuracy?  When you place that next pellet order, mix it up a little...you might be pleasantly surprised, as I was.  As for all those extra pellets you'll accumulate, well that's what a Crosman 2240 and soup cans are for.

Safe Shooting,
Ken

I'm Glad You Found Me!

Here goes my first post...am I blogging yet?  I've been wanting to share my renewed interest in the sport of airgun shooting with fellow enthusiasts and newcomers, and have made a couple YouTube videos (links in the sidebar).  Problem is, I've been too busy with work and obligations to set aside the time to make videos with any frequency, so I'm thinking this blog will allow me to share on a more convenient and regular basis.  Let's see how this Blogger host works out; I chose them pretty quickly based on their being simple, and free.  Hey I think it's time for a pic of an airgun!  Here's my very enjoyable-to-shoot RWS 350 Pro Compact.  I'll be doing a review of this gun soon:


Airguns provide an affordable and viable means of access to the shooting sports.  More importantly, airguns are a real pleasure to shoot, especially the accurate ones!  Many non-shooters and cartridge gun shooters alike are not even aware of the existence of a whole class of higher-end air rifles and pistols, but they'd be amazed at the performance, accuracy, and craftsmanship to be found.  Not saying it's neccesary to spend large dollars to obtain a good degree of function though - you can find Crosman, Daisy and Gamo products at Wal Mart that will shoot pretty well and offer lots of fun and value.  Then again, there's life beyond Wal Mart.  Spend some time on the web and you'll find an amazing array of air files and pistols very well suited to hunting of small game and precision target shooting.   I have not had the pleasure of shooting a PCP (Precharged Pneumatic) gun yet but I look forward to experiencing their precision and power, when the opportunity arises.  I enjoy shooting my air rifles and pistols every bit as much as my cartridge firearms, and I can enjoy them legally in my back yard range - which means I can do a lot more shooting!  I look forward to sharing a variety of airgunning experiences and observations here and getting some feedback from you, so let's meet again soon.
 
Safe Shooting,
Ken